Monday, December 24, 2012

Smoking Cap

It's cold outside, and it's snowing. A perfect time for a smoking cap.

This cap has two uses. The first - and whence the name - is it is what men would wear when they would smoke their cigars or pipes, in order to keep their hair from smelling smokey. This is also the idea behind the smoking jacket - something to keep your clothes smelling fresh. However, since I have (and many men of the time had) a moustache, there really isn't a lot you can do to keep from smelling smoky. Once you've smoked, if you try to kiss your sweetie she'll know. ;)

The other reason, and I think where the hat probably came from originally, is simply that without central heating it was cold in most houses, and you needed something to wear on your head. Not too formal - save the top hats and bowlers and homburgs for out-of-doors - but to wear in your own home you'd have a smoking cap, and a smoking jacket to wear along with it. These are really holdovers from an earlier time when men would wear a banyan:

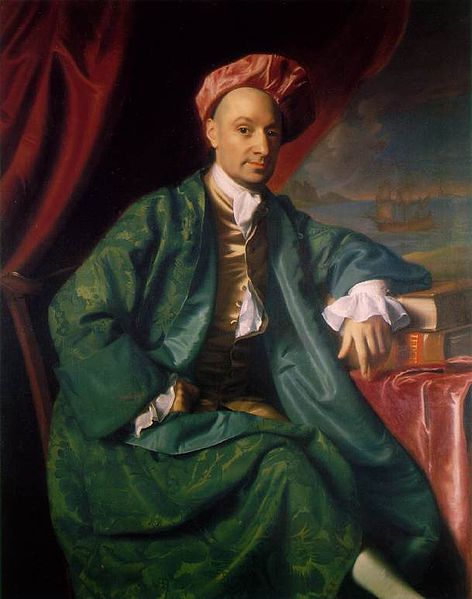
Ward Nicholas Boylston in a brilliant green banyan and a cap, painted by John Singleton Copley, 1767. From Wikipedia.
Well, I'll tackle the smoking jacket in another post. But as you can see, this picture shows Boylston also wear a turban-like hat. In the 18th century this hat was generally made of four panels of fabric coming together in a peak:

From: Modemakt/Power of Fashion Blog
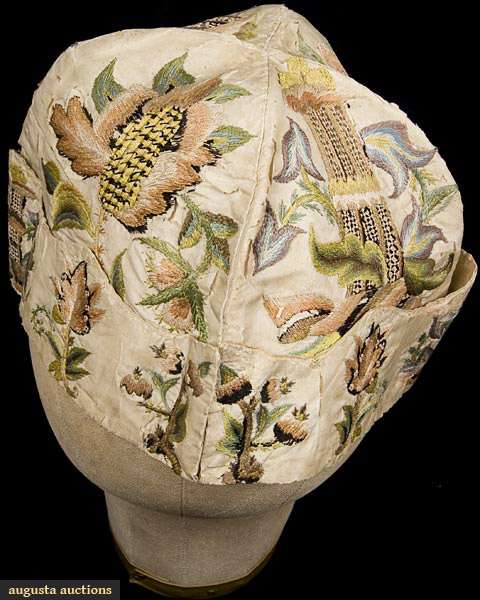
From: Augusta Auctions

These would eventually change to more of a fez/pillbox shape for the Victorian smoking cap.

There are plenty of links online to patterns for smoking caps from Godey's Magazine (sort of a Victorian version of Better Homes & Garden and Vogue, mashed together), but most of them are appliqué or couched cord and braid. I wanted to embroider my pattern, so I found (what I thought was) a simple motif, and repeated it three times on a piece of paper the diameter of my head. I figured that three inches tall looked about right.


I then used that paper as a pattern to cut out a length of heavy wool broadcloth - this is probably 28oz melton, definitely coat-weight - and a strip of linen backing. In the end I really didn't need the linen, but it helps the inside look neat. I cross stitched the wool to the linen.


I then basted the paper with the motifs onto the wool, and back-stitched around all of the borders. If I did this again I'd use stem stitch instead, for a fuller, more raised border, but at least that transferred the pattern to the cloth. I then tore away the paper, picked out the little bits from underneath the stitches with a pair of tweezers, and was ready to embroider.


Almost all of the embriodery is padded satin stitch. Some of the leaves are herringbone stitch, and the purple tips of the white flower are French knots. This wasn't simple. All told, it took at least 40 hours to embroider all three motifs.


As you can see from the back, I tried to keep the amount of embroidery floss used to a minimum.


And the finished cap. The button is a metal washer covered with the same wool.


Now, having shown all that, let me just say that making a smoking cap is not tailor's work. You might have been able to purchase one pre-made in a haberdashery, but most often I believe they were made by a wife for her husband. There's a reason so many patterns show up in Godey's ladies magazine. However, from the amount of work it takes to embroider such a cap, it's no wonder that most of the patterns are for couching and appliqué - those methods are much faster!

Sunday, November 18, 2012

Waistcoat 6: Finished

Finished! I like this waistcoat quite a bit. It fits very nicely, high under the arm in the armscye, which will give me good ease of movement. I know I haven't shown myself wearing any of the things I've finished recently, but once I have a whole outfit put together I'll wear everything at once.

This is the first time I've used silk thread for buttonholes. I have to say it's quite nice to work with. The only problem with these buttonholes is that the linen unraveled so easily. I had to do some thick overcast serging with regular thread before moving to the silk twist. 

Monday, November 5, 2012

Waistcoat 5: Almost Finished

First of all, here's a picture of what I was talking about in the last post, where the collar is sewn into the shoulder seam. This reduces additional bulk in the back, and keeps the collar from pressing against the back of your neck from the weight of the coat. A little thing, but remember that in Victorian times the coat was never taken off, so it doesn't matter what the back of your waistcoat looked like.


Now some pictures of the waistcoat at this stage. All it needs are buttonholes and buttons. And maybe a back adjustment strap. I was trying to make it fit well enough to not need a strap and buckle, but I think it will work better with it.

Here you can see some chalk marks I drew to make sure I line everything up correctly when putting on the buttons.

The back. I really wanted to make this of the same material as the lining, but as I bought the end of a roll of fabric for the lining I didn't quite have enough. I tried to make it work, even with the stripes running horizontally, but it just wasn't going to happen.

The lining. You can see pleats at the front shoulders in the lining to help keep it from pulling.

Detail of the felling where the lining meets the front facings.

And a detail of where the back lining meets the front. Remember that the front pieces were already lined before I added the back, so the back lining is felled onto the front lining.

I could have just made simple buttons, but I figured that a little extra something was worth it. I decided to do a very simple embroidery - just a few crossed lines tied together where they all cross. I did a circle of stay stitching around the edge of the button because this fabric frays very easily. Without the stitching, the fabric would just all fall apart at the back where I stitched it over the button molds.

A completed button. I sewed a thread shank onto the back of this one, but I'm not sure if I want to keep that, or simply sew the buttons directly onto the waistcoat. We'll see how this one works, or if it stands too far off the fabric.


Thursday, November 1, 2012

Waistcoat 4: Collar


This little guy was giving me some problems.

I was initially going to have a full collar on this waistcoat, with a stand and collar, wrapping all the way around the neck. My first draft of it was much too long, as I discovered in my muslin, so then I was waiting until I had completed the waistcoat before drafting the collar.

Since then I learned two things: first of all, how to draft the collar as it would look folded down, on the pattern draft, instead of opened up. That would have been easier than the way I did it, which is just to guess how the revers/lapel would fold down and look, and would have made it easier to judge the notch in the lapel. It would also have allowed me to draft the entire collar as part of the facing which wraps from the inside of the vest to the collar facing. Does that make sense? No? I'll have to find some pictures for a later post.

The second thing I learned is that many waistcoats, unless they have a shawl collar, just ended the collar at the shoulder seam. That is what I will do, so this little bit here is the underside of the collar, with the canvas pad stitched to give it some stiffness, and to create the roll from the stand to the collar. The front (right) will attach to the top of the lapel, and the rear (left) will be seamed into the shoulder seam. The next post will make all of this make sense, I promise.

Wednesday, October 24, 2012

Waistcoat 3: Canvas

 First of all, let me just say that I ordered light green linen thread online, and when it arrived I saw that it was really more of a mint dental floss electric green. I suppose that since the fabric for this waistcoat is made of green and yellow threads that I should have gone for the lighter yellow instead of green anyway, but I'll stick with this and just use it where it won't show anyway.

I finished all of the welt pockets and basted them shut so they don't pull out of place while I work with the canvas. I also basted the pocket bags folded up in half so they don't accidentally get sewn into the canvas or seams.

The next step is interesting because it uses the waistcoat itself as the pattern instead of the paper pattern. Because I stretched the fabric in a few places (on purpose, with an iron, to give the fabric some shape beyond its flat nature), I simply lay the fabric on top of the canvas, basted it in place, and then trimmed around the edges. I then trimmed an additional quarter inch around all the edges except for the side and shoulder, where it will be seamed to the back piece.

 The next step was to start shaping the lapels. I will eventually attach the collar to the tops of the lapels and neck. I'm not sure if the stay tape was needed here, but I put it in anyway, and then pad stitched the lapel. I've done this on a sample piece but never for real, and I must say I'm pretty happy with the result. The fabric is now stiffer because of being attached to the canvas, and it also folds back on its own, without any pressing.

Below the lapel you can see an additional piece of canvas added for buttonhole support.

 This is the back of the lapel. The line of basting stitches to indicate the roll line is still there, as well as the basting for the canvas, but otherwise you can't see any bright green thread from the stitches. Just a lot of little dimples. You can see how the lapel doesn't like being opened up flat, and wants to fold back.

Almost finished with this side. I just need to add the lining. Stay tape has been basted in around the bottom and front edges, and then the edge of fabric folded up over it (for a better picture of this, look at the the second photo, with the pad stitching - you can see that the edges have all been stitched back) and sewn in place with cross stitching. The stay tape gives it a nice firm edge. The armscye has been cross stitched in place without stay tape, so it's a little softer, and will go around my body better.

I said above that I just need to apply the lining. Unlike most modern patterns, this waistcoat is not made in two pieces with a shell and a lining. The lining is applied directly to the two front pieces, which are then attached to the back as complete pieces. I suppose it would be much easier to alter the waistcoat without having to change the lining, since it's all attached. Does that make sense? It will in my next post.

Friday, October 19, 2012

Waistcoat 2: Starting out

After making a muslin - fully lined and canvassed - by hand, and finding all sorts of things wrong with my original pattern, I adjusted the pattern and cut out my fabric. Here you can see the green/yellow linen I'm using. I've basted in the roll line and pocket lines (and then remembered I don't want a top/watch pocket on the right side) and basted in canvas for the pockets. The pocket pieces are below.

This is going to take a while to finish, but I'm glad I made the muslin first - it taught me a lot. I'm not entirely sure how I'm going to do the notch collar. I made it in two pieces for the muslin, but I'd like to use just one for the final version, so I think I'm going to have to wait and add it in last when I can get an accurate measurement for the perfect size. I'll pad stitch it, along with the lapels on the waistcoat.

Saturday, September 29, 2012

Welt Pockets

Every time I've followed a pattern that has welt pockets, it seems that the directions for them are all different. I also have a hard time remember how I did it last time, so that every time I make a welt pocket (and here I'm talking about single welt pockets) I have to learn how to do it all over again.

This time, since I'm drafting my own pattern and can make the pieces however I like, I'm going to follow the method set out in The Victorian Tailor. The author gives two methods, but this is the one which he says is used most often after 1850.

In my pictures, since I wasn't thinking at all and used white thread against tan fabric, I've highlighted the stitches. I used yellow for basting stitches and red for final stitches.

Here is the piece to which I'm adding a welt pocket (the muslin for my waistcoat). I've drawn in chalk where the welt should go, with a line through the centre which is where the opening will be cut. As with almost all of the photos on this blog, you can click to enlarge them.

These are the pieces which will make up the pocket. The two top pieces are the pocketing. The left piece is for the bottom pocket, and the right is for the top. It is longer by the height of the welt (the height of the box I've drawn on the piece above). The bottom left is the welt itself, and the bottom right is a scrap of canvas I've cut to 1" longer than the finished welt.

The canvas is basted to the wrong side of the fabric. Luckily the muslin is thin enough that you can see the outline of the canvas through it. I also should have ironed it.

The welt is basted to the right side of the fabric. My seam allowances are all ¼", so I line up the welt so that the seam line lies on the bottom chalk line.

I then baste the top pocketing fabric, right side down, so that the bottom edge lines up with where the pocket opening will be cut. This is lower than the top chalk line.

Sew the seams for the welt and pocket. The welt seam goes from edge to edge of the chalk marks. The pocket seam ends ¼" inside the lines on both sides. Not to the edges.

Take the basting stitches out of the welt, and sew the bottom pocketing to it, right sides together. It won't lie flat, as shown below. This seam is the same length as the other welt seam - the total width of the pocket. Notice that the pocketing is ¼" wider than the welt. This is true for both pieces.

This is now what the right side of the fabric looks like, with all the pieces sewn in.

And this is what the wrong side looks like. Notice the basting stitches still in place. Now we will cut the pocket opening. Unlike any other welt pocket directions I've seen, this pocket is asymmetrical. It actually works out extremely well that way. Cut the opening the same width as the width of the pocketing seam. Cut straight up from the opening to the seam ends. Do not cut into the pocketing! Cut at an angle down to the seam ends of the welt. Do not cut into the welt! The pocket opening slit should only cut through the fabric and the canvas.

Pull the welt and attached bottom pocketing to the wrong side, and fold down the top pocketing on the right side (undoing the basting on the pocketing). This is what the right side looks like:

And this is what the wrong side looks like:

Fell stitch a piece of linen stay tape to the centre of the welt. I've folded the welt in half to find the centre. Try to make the stitches as small as possible so they don't show on the right side (though if they do they'll look like prick stitches, so it probably won't be that bad).

Fold the welt down (still from the wrong side of the fabric) and baste in place. You can see the basting stitches still in the canvas we basted down in the first step. This is a good time to press everything with an iron. The seams for the welt get pressed up into the welt on both sides. The seams from the pocketing get pressed toward the pocketing on both sides.

Push the welt through the pocket slit to the right side. Make sure it sits neatly on top of the fabric with no puckering. You'll see that because the pocketing is sewn to the welt ¼" from the edges, the welt will sit on one side of the slit and the pocketing on the other side without any bunching.

This is what the back looks like, all neatly arranged. Once again the top pocketing sits nice and flat, lying on top of the bottom pocketing.

Sew around the pocketing in an appropriate pocket shape. You can use back stitch or running back stitch. Make sure that the bottom isn't so long that it will interfere with the bottom hem of the garment when you finish it. I've pinked the edges so the pocket doesn't fray, but that probably isn't really necessary.

STOP! Do not complete this step yet if you are going to add canvas to your garment. If you are going to add canvas, complete this step afterwards, so that you can stitch through the canvas as well. That will both strengthen the pocket and help hold the canvas in place, which will strengthen the garment.

When you are ready, hem in the edges of the welt. You can trim away most of the fabric that you hem in, so the edges aren't too bulky. Fell the edges, and across the tops ¼" on each side. Prick stitch (through all layers, including the canvas) down from the end of the fell stitching, ¼" from the edges. In this picture I've prick stitched the edges instead of felling, but that's because I didn't read the directions properly. It will look better if you use invisible fell stitches, and then prick stitch like you should ¼" from the edges.

And there's your finished welt pocket! Repeat 100 times so you don't forget how to do it, and don't take 4 hours to do it like I did, interspersed with cursing.

Tuesday, September 25, 2012

Waistcoat 1: drafting a pattern


I have a waistcoat pattern that I've used several times before - the Laughing Moon #109 frock coat with waistcoat (I've also used the frock coat pattern, early in my sewing career, and at that point vowed I'd never make another frock coat; now I can't wait to make more). This time, however, I decided to draft my own pattern. I wanted two things: first of all, to have the back fit properly, without needing an adjustable belt, and second to have a basic pattern block that I could alter to make different styles of waistcoat.

Interestingly, although he gives detailed drafting directions for trousers and coats, Jason Maclochlainn doesn't describe how to draft a waistcoat in The Victorian Tailor. I will definitely be using his description for tailoring the garment, but to draft it I turned to The Cutter's Practical Guide to ...Waistcoats, &ct. (seriously, could these titles be any longer?). As happened the last time I drafted a pattern, I was cruising along, following the directions perfectly, and then suddenly nothing made sense anymore. The points referred to in the text didn't match the pictures. The text went from well-defined blocks of directions to one long, run-on paragraph containing several steps at once:
Now take Vincent's Registered Square, and place the angle line sloping down ¼ in front, and with the corner on point 2¼, and draw line up to A, and make 2¼ to A the front shoulder measure less ¼in., having deducted the width of back neck; so that in this case O to A is 9¾, that quantity being arrived at as follows 12½ less ¼ equals 12¼; from this take 2½ for the back neck, and you get 9¾. From 2¼ to 9 apply the over-shoulder measure less ½ E of the back, Diagram 3. Thus: ½ to E 8½ leaves 8½, but from this we also take ¼in., as with the front shoulder. The width of the shoulder from A to B is made ¼in. less than back from ¾ to 6, Diagram 3. Now shape scye from B to O.
 Riiiight. Never mind that all of the points referenced (the numbers) are based on an example set of measurements, and that your numbers will all be different.

I muddled through somehow, and ended up with a pattern that looked like the one in the example (except for the slightly rounded midsection to accommodate my slightly rounded midsection). I cut out a quick muslin, and discovered very quickly that having a personal tailor's form of my body would be great. I have a mannequin body that my wife got for me from the trash (yay, trash!), but he's a little manlier in the shoulders and chest than I am, so this form-fitting pattern won't fit him.

I also found that the images of taking measurements show having the measurements taken over a waistcoat on purpose. You're supposed to wear the garment you're measuring for. Which seems a little odd to me, but then again it makes sense that you're then basically copying the measurements of a garment that you know fits you. I had only been wearing a shirt when I was measured, so the waistcoat was pretty snug.

The last thing I discovered is that I can't draw an armscye to save my life.

 The final image here is of the altered armscye that will actually fit around my arms (it's a little lower I think than the example diagram expects it to be, but I'll be able to play with that later). I reduced the height of the back of the neck. I'm also going to add some seam allowances on some of the edges to give it a little more play.

The next step will be to make a test garment in muslin before I finalise my pattern. That will also allow me to make pattern pieces for the other bits of the waistcoat that aren't in the initial draft: the collar, the facings, the lining, the canvas, and the pockets and pocket welts.

Starching a Shirt Collar

I never posted finished pictures of my Victorian shirt because I needed to starch the collar and cuffs. In the past I've simply mixed corn starch with water and used that (and more on that method later in this post), but I wanted to think about using other methods.

I have a book from 1907 titled Henley's Twentieth Century Formulas, Recipes and Processes, which in the manner of manuals from that time continues with a rather long subtitle: "Containing ten thousand selected household, workshop and scientific forumlas, trade secrets, chemical recipes, processes and money saving ideas." This sort of book is common for the era, and is similar to Beeton's Book of House Management. It describes how to do just about anything one might need to do around the house - and I mean everything. From laboratory methods to making adhesives and laundry soaps, to alloying metals, to making coloured paints, to mixing concrete, to making beer, this book has it all. Need to know how to repair your meerschaum pipe? This book will tell you how. Need to drill glass? This book will tell you how. Need to make dynamite, smokeless gunpowder, or blasting powder? You got it - this book will tell you how.

One problem with many of the recipes is that I imagine many of the chemical ingredients required for the recipes aren't as easily obtained these days. For instance, if I want to cure my canary's asthma (no joke, this is in there) I need:

Tincture capsicum, 5 drachms
Spirits chloroform, 90 minims
Iron citrate, soluble, 45 grains
Fennel water, 3.5 ounces
Give a few drops on lump of sugar in the cage once daily.

Now I'm pretty sure it's hard to get chloroform these days. To quote Back to the Future, "I'm sure that in 1985 plutonium is available in every corner drug store, but in 1955 it's a little hard to come by." And that brings us to the starch recipes. Here's what the book has to say about starch:

Most laundry starches now contain some polishing mixture for giving a high luster.
I.--Dissolve in a vessel of sufficient capacity, 42 parts of crystallized magnesium chloride in 30 parts of water. In another vessel stir 12 parts of starch in 20 parts of water to a smooth paste. Mix the two and heat under pressure until the starch is fluidified.
II.--Pour 250 parts, by weight, of water, over 5 parts, by weight, of powdered gun tragacanth until the powder swells uniformly; then add 750 parts, by weight, of boiling water, dissolve 50 parts, by weight, of borax in it, and stir 50 parts, by weight, of stearine and 50 parts, by weight, of talcum into the whole. Of this fluid add 250 parts to 1,000 parts of boiled starch, or else the ironing oil is applied by means of a sponge on the starched wash, which is then ironed.
III.--Starch, 1,044 parts, by weight
Borax, 9 parts, by weight
Common salt, 1 part, by weight
Gum arabic, 8 parts, by weight
Stearine, 20 parts, by weight
Number II gives me a headache just reading it. I'm pretty sure borax is available, at least by mail order, but I have to admit I'm not sure about some of the others. So...I think I'm going to just stick with using plain starch, 2 tablespoons in 1 pint of water, and for a shine I'll rub a bar of soap on the collar when I iron it. Process: soak the collar and cuffs in the starch mixture for a few minutes and remove, using your fingers to work the starch into the fabric and make sure there are no lumps. Allow to dry overnight on a flat surface. Before ironing spray with water, rub a bar of soap on the collar, and iron and polish until almost dry. Place in a collar box or pin the ends together and allow to dry completely in a curved shape.

Thursday, September 20, 2012

Steampunk Asylum 2012

My wife and I attended the Steampunk Asylum in Lincoln, UK. It was amazing, and so much fun to see so many people dressed in outstanding outfits. I always hesitate to use the word "costume" since, at least in regards to strictly Victorian clothing, this is what people actually wore, and not a costume at all. I know steampunk can get a little costume-y, but I still like to use the word "outfit" instead.

In any case, the weather was remarkably warm for an English September, and I sweat through everything because of course I insisted on wearing my frock coat and top hat as I climbed up Steep Hill. And believe you me, the name of that street is well earned! There's nothing like a steep cobblestone street to get the costume wilting.


In any case, I was wearing the shirt and trousers I made for this blog. The collar and cuffs didn't get quite as starched as I would have liked, and I might make them over again without the interior, heavier linen interlining. They just felt bulky to me, but at least they still looked good.

Apart from the goggles, I was really more "Victorian" than "Steampunk" which is something I struggle with. I really like the steampunk aesthetic, but I have a hard time finding an outfit that works for me. My wife, on the other hand, chose to take an almost literal interpretation, and went for a Victorian take on 70's London punk. The corset you've seen in a previous post; I also made the bell skirt and the leather choker with steel spikes and pearls.