Showing posts with label shirt. Show all posts

Friday, May 3, 2013

1830s Shirt: Part 2

I'd just like to make a quick note about thread. For this linen shirt I'm using linen thread (60/2 weight). I have 8 needles that I thread up at a time, which gives me an hour or so of sewing. Yeah, I'm slow, but that also includes matching up seam lines and things. I cut 8 threads, each about two feet long. I don't really measure, but line them up from the edge of the table to one of the lines of the boards. Once I've cut them, I wax each thread with the lump of beeswax you see below. I gather the threads and fold them in a piece of paper, and then iron the paper on about the wool setting. Not too hot, but enough to melt the wax into the thread. That makes the thread stronger, and keeps it from knotting up too much as I sew.


Then I thread each needle and stick it in my pincushion, ready to sew.

Here I'm preparing the sleeve for gathering. At first I was using white basting thread, but found it difficult to see the first row of stitching so I could match it with the second row.

So I switched to blue basting thread. Much easier.

Here's the cuff, all set in. For the record, the above pictures are of the sleeve head, not the cuff.

Check out that 1/8" flat felled seam - yeah!

Finally, to finish the shirt I sewed in the bosom piece, also called the lining in The Workwoman's Guide. This piece was measured to exactly fit the sleeve hole, and when I fell stitch the fabric tends to creep. Because in my mind this is "just a shirt" and not a "tailoring" project I didn't take time to baste the lining in place before sewing it. So the ends didn't match up. No problem, I just folded over the bit of exposed seam at the bottom of the sleeve gusset and flat felled it.

Finished shirt! This falls to my knees, which the directions call for.

Since I already made my Regency shirt in a similar style, I called this one #2. You can see the embroidery in the above photo as an out-of-focus red smudge at the left hip gusset.

The collar and cuffs got buttons and buttonholes. The directions don't call for any particular kind of button, so I chose bone.


Now, as for differences between this shirt using the directions from The Workwoman's Guide, and the Kannik's Korner pattern. They are very very very similar. I believe one of the sources for the Kannik's Korner pattern was an earlier edition of The Workwoman's Guide. The neck gussets in this version are single-sided, unlike the ones in the Kannik's Korner pattern. That means it leaves some exposed seams at the underside, which I cross-stitched as you can see below. This may become a problem, and I might have to insert a second gusset later if I notice it fraying. This is the only exposed seam on the shirt.

You can see the difference in collar height. Kannik's Korner pattern on the right.

The bosom lining in this pattern is much wider (again, Kannik's Korner on the right). I can see why it's referred to as a lining in The Workwoman's Guide.
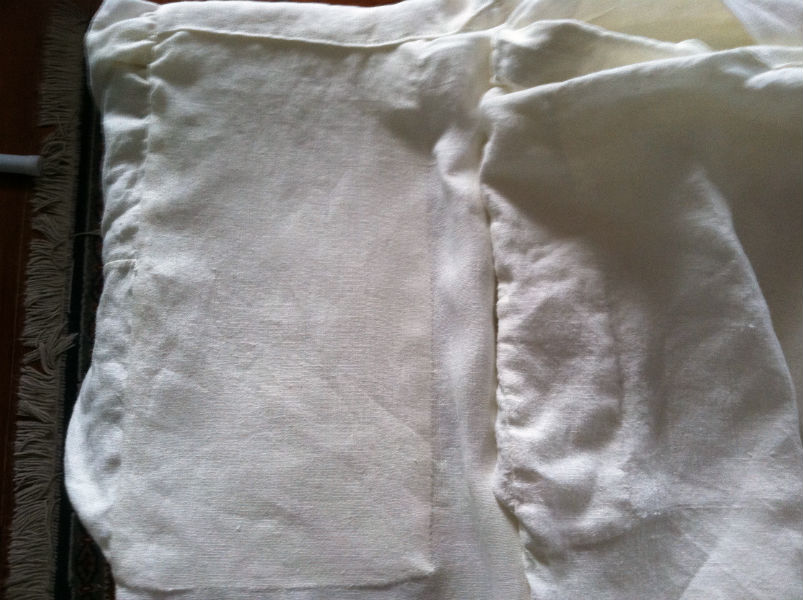
Sorry I switched sides. This time the Kannik's Korner pattern is on the left. In that pattern the ends of the shirt match front and back. In The Workwoman's Guide the front is one nail shorter than the back.

Those are the only real differences! The directions in The Workwoman's Guide are in a different order than the sewing directions from the Kannik's Korner pattern, but it doesn't really matter which you use. I referred to the Kannik's Korner directions from time to time because they're written more clearly, but they're basically the same.

Next time, drawers....

Tuesday, April 23, 2013

1830s Shirt: Part 1

I've taken the directions for this shirt directly from The workwoman's guide: containing instructions to the inexperienced in cutting out and completing those articles of wearing apparel, &c. which are ususally made at home : also, explanations on upholstery, straw-platting, bonnet-making, knitting, &c. That's quite a mouthful for a title! I'll just call it The Workwoman's Guide from now on. This book was published in London in 1838. One thing to mention given that it's an English book: the terms "muslin" and "calico". These terms are exactly the opposite of what they are in American English, for some reason. In the U.S. muslin is a coarser, cheap fabric, and calico is a tightly-woven cotton, often with a small repeating print. In England, calico is the coarser, cheap fabric, and muslin is a tightly-woven cotton, often with a small repeating print. Just something to keep in mind, because The Workwoman's Guide refers to these fabrics.

The directions for shirts begin on page 138, <linked here>.

I've used the measurements for the "man's larger size" on page 139. If you look at the measurements you'll see Yds. and nls. Nls? Yes, there's a new unit of measurement here: nails. Apparently this was a unit of measurement for fabric, and it goes as follows: 4 nails = 1 quarter. 4 quarters = 1 yard. 5 quarters = 1 English ell, and 6 quarters = 1 French ell. Of course the French have to be different. :) That means that 1 nail = 2.25 inches. Simple, right? Well, since all of the measurements from The Workwoman's Guide are given in nails, I figured that instead of converting all the time I would just make a tape measure in nails. My tape is one ell (English) long.


 Okay, back to the shirt. This pattern is very similar to the Kannik's Korner 1790-1830 shirt that I made before, but I wanted to make one according to the directions in The Workwoman's Guide this time. Some of the measurements are very similar, and some are a bit different, and I'll make a comparison when I've finished this shirt.

According to The Workwoman's Guide "Shirts for labouring men are generally made of the stout linen called shirting-linen." I chose a 5.3 oz linen from Fabrics-store.com. Since all the pieces are rectangles or squares, I drew threads to make sure I cut in straight lines.


Modern fabric comes in widths much larger than period fabric, so even though the directions called for using fabric exactly 14 nails wide, I had to cut mine to size. However, given the width of the fabric I was able to get all of my pieces cut from exactly 2 yds, 2 nls of length.


One thing I couldn't find in the pattern list was wrist gussets, which are mentioned in the directions for making up the shirts. Since I think wrist gussets would probably just get in the way anyway, I didn't worry about them.

One thing I found with this shirt that was the same as the Kannik's Korner shirt I made was that the length of the shoulder straps is longer than necessary. I'm guessing that this is just so you can sew them on long and then trim them to the exact length which is better than having them too short:


Here I've gathered the very wide shirt body (18 nails, plus about 1 nail added with the neck gussets) into the collar (8 nails).

With the collar folded down this is starting to look like a shirt!

I've begun to prepare the cuffs for sewing. In order to stitch in a straight line I've drawn threads as guides. You can see the border threads for seams, as well as guides for topstitching.

That's all I've got so far. Stay tuned for more!

Tuesday, September 25, 2012

Starching a Shirt Collar

I never posted finished pictures of my Victorian shirt because I needed to starch the collar and cuffs. In the past I've simply mixed corn starch with water and used that (and more on that method later in this post), but I wanted to think about using other methods.

I have a book from 1907 titled Henley's Twentieth Century Formulas, Recipes and Processes, which in the manner of manuals from that time continues with a rather long subtitle: "Containing ten thousand selected household, workshop and scientific forumlas, trade secrets, chemical recipes, processes and money saving ideas." This sort of book is common for the era, and is similar to Beeton's Book of House Management. It describes how to do just about anything one might need to do around the house - and I mean everything. From laboratory methods to making adhesives and laundry soaps, to alloying metals, to making coloured paints, to mixing concrete, to making beer, this book has it all. Need to know how to repair your meerschaum pipe? This book will tell you how. Need to drill glass? This book will tell you how. Need to make dynamite, smokeless gunpowder, or blasting powder? You got it - this book will tell you how.

One problem with many of the recipes is that I imagine many of the chemical ingredients required for the recipes aren't as easily obtained these days. For instance, if I want to cure my canary's asthma (no joke, this is in there) I need:

Tincture capsicum, 5 drachms
Spirits chloroform, 90 minims
Iron citrate, soluble, 45 grains
Fennel water, 3.5 ounces
Give a few drops on lump of sugar in the cage once daily.

Now I'm pretty sure it's hard to get chloroform these days. To quote Back to the Future, "I'm sure that in 1985 plutonium is available in every corner drug store, but in 1955 it's a little hard to come by." And that brings us to the starch recipes. Here's what the book has to say about starch:

Most laundry starches now contain some polishing mixture for giving a high luster.
I.--Dissolve in a vessel of sufficient capacity, 42 parts of crystallized magnesium chloride in 30 parts of water. In another vessel stir 12 parts of starch in 20 parts of water to a smooth paste. Mix the two and heat under pressure until the starch is fluidified.
II.--Pour 250 parts, by weight, of water, over 5 parts, by weight, of powdered gun tragacanth until the powder swells uniformly; then add 750 parts, by weight, of boiling water, dissolve 50 parts, by weight, of borax in it, and stir 50 parts, by weight, of stearine and 50 parts, by weight, of talcum into the whole. Of this fluid add 250 parts to 1,000 parts of boiled starch, or else the ironing oil is applied by means of a sponge on the starched wash, which is then ironed.
III.--Starch, 1,044 parts, by weight
Borax, 9 parts, by weight
Common salt, 1 part, by weight
Gum arabic, 8 parts, by weight
Stearine, 20 parts, by weight
Number II gives me a headache just reading it. I'm pretty sure borax is available, at least by mail order, but I have to admit I'm not sure about some of the others. So...I think I'm going to just stick with using plain starch, 2 tablespoons in 1 pint of water, and for a shine I'll rub a bar of soap on the collar when I iron it. Process: soak the collar and cuffs in the starch mixture for a few minutes and remove, using your fingers to work the starch into the fabric and make sure there are no lumps. Allow to dry overnight on a flat surface. Before ironing spray with water, rub a bar of soap on the collar, and iron and polish until almost dry. Place in a collar box or pin the ends together and allow to dry completely in a curved shape.

Thursday, September 20, 2012

Steampunk Asylum 2012

My wife and I attended the Steampunk Asylum in Lincoln, UK. It was amazing, and so much fun to see so many people dressed in outstanding outfits. I always hesitate to use the word "costume" since, at least in regards to strictly Victorian clothing, this is what people actually wore, and not a costume at all. I know steampunk can get a little costume-y, but I still like to use the word "outfit" instead.

In any case, the weather was remarkably warm for an English September, and I sweat through everything because of course I insisted on wearing my frock coat and top hat as I climbed up Steep Hill. And believe you me, the name of that street is well earned! There's nothing like a steep cobblestone street to get the costume wilting.


In any case, I was wearing the shirt and trousers I made for this blog. The collar and cuffs didn't get quite as starched as I would have liked, and I might make them over again without the interior, heavier linen interlining. They just felt bulky to me, but at least they still looked good.

Apart from the goggles, I was really more "Victorian" than "Steampunk" which is something I struggle with. I really like the steampunk aesthetic, but I have a hard time finding an outfit that works for me. My wife, on the other hand, chose to take an almost literal interpretation, and went for a Victorian take on 70's London punk. The corset you've seen in a previous post; I also made the bell skirt and the leather choker with steel spikes and pearls.

Thursday, June 7, 2012

Victorian Shirt: Part 7 (collar and cuffs 4)

Nearly there!

I drafted a pattern for the cuffs based on #1 of the cuff designs to the right. I wasn't sure why it has the stitches around the centre, however. Was it made in two halves and assembled? That's what it looks like, with the seam stitched, and then a row of topstitching on either side. Well, I made my cuffs as one piece, but added a row of stitching around the centre in any case, figuring it will help keep it from stretching out of shape. Maybe by making the cuffs in two pieces helped use up smaller pieces of cloth the shirt makers had lying around.

I added a quarter inch seam allowance to my pattern, and prepared to sew it. Like the collar I used two layers of fine linen for the outer pieces, and a slightly heavier linen for the interlining, in order to absorb more starch and keep it stiff.

Here's a cuff with the centre stitching completed, and prick stitched around the outer edge. I've punched holes for the buttonholes, but haven't cut the slits yet. I'm going to baste the layers together first so they don't move around once I cut the slits.

Here's the basting, and the slits cut. Once again I used a half-inch chisel to cut the slits, including the diameter of the punched hole in the length.

The cuff fastened on the sleeve. The top stud is a button stud, which goes through all four layers: the two cuff band layers of the sleeve and the two layers of the cuff itself. That holds it onto the sleeve. The bottom stud is actually a collar stud until I get some button links that I want to use. I could use cufflinks, but the links with the swivel foldy bit (technical, I know) aren't period correct for a Victorian shirt. Button links are two shank buttons connected by a little loop of metal - basically just a double-headed button.

The view of the cuff most people will see. Well, they'll only see an inch or so peeking out from beneath a coat. That's the hard part of spending so much time on a shirt - people will only see a little flash of white, and the rest is always hidden. Oh well, I'll know (and so will all of you, having seen the whole process).

The last step is to wash out the chalk marks and starch and press the collar and cuffs. Then it's on to the next project!

Tuesday, May 22, 2012

Victorian Shirt: Part 6 (collar and cuffs 3)


The collar is finished. I need to starch it, but I'll wait until I've finished the cuffs, and do them both together. Still, it stands up nicely on its own. The starch will help that, and will give it an almost papery sheen as well. I'll press the seams nice and crisp too. It isn't clear from these photos, but one thing I did to help alleviate some bulk in the buttonholes was to give the front holes a...hmm, I'm not sure how you call it. It isn't just a straight flat hole, but a round punch-out where the stud rests, and then the slit for the rest. I'll post an image later of what I mean.

In any case, here are some close-ups of the collar front and back. As always, you can click the images for a larger view.


Sunday, May 20, 2012

Victorian Shirt: Part 5 (collar and cuffs 2)

I decided to start with a collar from the Cutter's Practical Guide. The first thing I did was measure between the buttonholes on my shirt's collar band to figure out the actual measurements. Then I chose collar pattern #1 and scaled their dimensions to mine. I've actually made a set of scaled measuring tapes, but for this it was actually easier for me to just scale it by eye.

(I'm sure I'll make a post in the future about scaled tapes, but basically you get your real measurement, let's say for example 9.5" from the back centre of the collar to the tip, and compare that to the 8.25 the pattern calls for. Find a tape where 9.5" matches 8.25, and then use that tape for all your measures. It doesn't matter that 8.25 isn't in real inches, but just that all your measurements come from that tape. Make sense? No? I'll make a post about it in detail later.)


You can see below my pattern, with a quarter inch seam allowance added, and the nearly-finished collar. I made it of two layers of handkerchief-weight linen for the outside, and interlined it with the 5.3 oz linen I used for the rest of the shirt. From what I've read the heavier lining not only gives it more form on its own, but also absorbs and holds more starch, making it crisper in the end. I apologise for the horrible quality of the photo, but at this stage it's been sewn and prick stitched around the edge, and I've started on the centre back buttonhole.


Here's a closeup of the buttonhole in progress. I've basted around it so the three layers don't move while I work on it, and serged the edges of the buttonhole so it doesn't fray. I cut the hole itself in the traditional fashion, with a chisel. This keeps the hole cleaner than if I try to snip at it with scissors.


Finally, the finished buttonhole. I made my own twist with two strands of linen thread, waxed and twisted. Of course it picked up a little dirt and oil from my fingers when I did that so it isn't perfectly white, but I think that will partly wash out, and in any case will be under my tie while I'm wearing the collar.


Monday, May 14, 2012

Victorian Shirt: Part 4 (collar and cuffs 1)

The shirt is finished! I don't have a picture of it!

Well, it pretty much looks like the last photo in the previous post, except that it has a collar band on it.

Interestingly, since finishing I learned about a different method of doing cuff bands and collar bands that would drastically help with my problem of too much fabric to fit a collar stud through (though I think it won't be a problem with this shirt). Instead of fashioning the bands from fabric, reinforced with interlining, simply use a piece of stiff ribbon or tape, such as petersham or a starched grosgrain. It would certainly cut down on bulk.

Now that I've finished the shirt I need to make a collar and cuffs for it. Thinking about the styles, I came across some really interesting cuff designs from Ageless Patterns:

It strikes me as odd that all of the cuffs fasten from the centre of the cuff instead of at the ends. Since the first set of buttonholes is for attaching it to the cuff band, that means that half the cuff comes back over the sleeve and the wrist. I don't know if that would even be comfortable. I may have to draft a cuff like this and try it out, just to see what it's like.

In any case, I'll make a collar or two as well, and will probably choose something from The Cutter's Practical Guide (189?) or from patterns from the Costumer's Manifesto.

Thursday, May 10, 2012

Victorian Shirt: Part 3 (wristbands)

Augh, it's been so long since I posted! What can I say? I haven't had as much time to sew lately, but the main reason can be summed up in three words: Game of Thrones. Once I started reading I couldn't stop until I'd finished all four books that are out in paperback now. Okay, now to the shirt:

To finish the sleeves I needed to add cuffs, but since I want to have detachable cuffs on this shirt I added shorter wristbands to which the cuffs will be attached with button studs. Instead of using interfacing I interlined the wristbands with the same linen as the rest of the shirt:

Then after sewing all three layers I turned the wristbands right side out and pressed one tab inside to attach it to the sleeve.

And here is the finished wristband, with two buttonholes to push a button stud through:

This shirt gets gussets at the bottoms of the side seams, just like the Regency shirt, except that the bottom hem of this shirt is a lot more curvy, more like the curved shirt tails of today:

And finally, the nearly-finished shirt. All it needs now is a collar band. I want to be careful with that, making sure that it isn't too bulky where the collar stud will go through the front. I'll have to trim the seam allowances close there, especially where the front button placket comes up into the collar band.

Saturday, March 24, 2012

Victorian Shirt: Part 2 (back, yoke, and sleeves)


It's been a while since my last post, but I've been busy. Not on the shirt though - just working a new job for two weeks, so I had to concentrate on that.

Anyway, I attached the front and the back of the shirt. I'm always amazed at how the shoulder yoke works on shirts. Basically it's a tube that contains all of the seam allowances. Because it's a tube it's a little stronger than a single layer of fabric (though I've seen shirts - and in fact have made shirts - where the yoke is cut on the bias, which allows it to move in different ways).

The images to the right and just below show the front and the back (the back is gathered to fit into the yoke; on most modern shirts there are either two side pleats or one centre pleat to accomplish the same thing).

The next step was to start work on the sleeves. The first task was to make plackets for the cuff openings. Again, these are seemingly complicated, but really just reinforce and contain the hems. I remember the first time I made sleeve plackets I thought they were arcane and very strange. Now I understand how they work, and they really aren't that difficult to make, although hand sewing made them a little bit wonky on this shirt. I don't know if it's because I didn't pin it well enough, or if just handling the shirt pulled the placket off from where I wanted it to be. In any case, no one will ever see them, as I'll be wearing a jacket over the shirt at all times. No one would see me in my shirtsleeves!

Below you can see the black chalk marks for the folds and cuts of the placket. I've already made some of the folds already, so the right-hand portion of the placket isn't showing the chalk lines.

Here I've stitched around the border of the Y-shaped line, and then cut along that line. I turned the placket inside out. In this picture I ironed it flat and then realised that I shouldn't have done that, and ironed the folds out again. I really don't want any gap to show, not like that huge gap below. The edges of the cut should be right next to each other, just with the placket wrapping around them. Does that make sense? It really does make sense if you follow the directions right.

Here is the finished placket. Just a little wonky. If I'd machine stitched it, I would have used a topstitch all the way around, but since I was hand sewing I used a fell stitch for the entire thing, except for a back stitch across the top of the placket point to hold it all together.

Finally, the (almost) finished sleeves. I still need to put the cuff bands on them. This shirt will have separate cuffs, just as it will have a separate collar. That way you could wear the same shirt a few times and always have clean cuffs and collar, which are the only parts anyone would really see anyway. The sleeve seams are flat felled.

Friday, March 16, 2012

Victorian Shirt: Part 1 (front)

My original shirt. © 2011 Kelly Davidson
Finally I am beginning the Victorian tailoring portion of my Victorian tailoring blog. Now, I already have a shirt that I've made - in fact, I made an entire Victorian suit for my wedding. I learned a lot doing those, but now I'd like to start over and make more clothing while taking pictures for all of you. :)

The shirt I made is actually great. It's made of cotton, and looks wonderful. It has two problems, both with the collar. The first is that I didn't quite centre the rear buttonhole in the collar band, so that unless I made a custom separate collar with an off-centre buttonhole to match I can't wear collars. The other problem is that I didn't trim the excess fabric in the seams at the front enough, so that the collar stud can't make it through all four layers of the shirt that it needs to: two halves of the collar band, and two halves of the collar. The only way I can get the collar to stay fastened in front is to skip the back layer of the collar band, and only attach the collar to the front layer. This works as long as I'm wearing a tie of some sort, but shows that the collar isn't really fastened if I don't. I'll work hard to make sure this isn't an issue with the new shirt (also, my wife gave me some new collar studs for our anniversary, and I think they're a little longer than the ones I had).

The new shirt is to be made of the same linen I used for the Regency shirt. It's heavier than the cotton (the linen is 5.3 oz from fabrics-store.com), but I hope after some washings it will be very comfortable. In any case, it'll work as a winter-weight shirt if it doesn't soften up a lot. Once again, I'm using the Laughing Moon Mercentile #107 pattern. I don't need to make a muslin, because I know the shirt already fits.

The first steps brought me through attaching the bosom bib and the trouser tab (which I've never actually used - I guess my trousers aren't high-waisted enough) to the shirt front. In the first shirt I made I put in a pleated bosom, but I left it plain on this one. You can see that my hand stitching isn't perfectly straight, but I'm working on it! I think maybe putting in a row of basting stitches to act as a guide might help. Any thoughts on how to keep my stitches straight?

The bosom is attached to the front with a flat felled hem, though it's never called that in the directions. The part that actually took the longest was sewing the seven buttonholes (one for the trouser tab, and six for the button studs on the front). I'm happy with how they came out - I'm definitely getting better and hand-sewn buttonholes.

 Here I'm in the middle of serging the edges of the hole. You can see that it needs this step to keep the fabric from fraying - the loose thread running the length of the slit is from the fabric itself, not from my sewing. It's about to be held in place with the next set of stitches.

And here's the finished product. The above shot is from the back, where I made my black chalk marks. This is the front, all neat and tidy.